什么是identityServer4 IdentityServer4是一个用于ASP.Net Core的OpenID Connect和OAuth 2.0框架
通过使用 IdentityServer4 你可以
认证服务 可以为你的应用(如网站、本地应用、移动端、服务)做集中式的登录逻辑和工作流控制。IdentityServer是完全实现了OpenID Connect协议标准。
单点登录登出(SSO) 在各种类型的应用上实现单点登录登出。
API访问控制 为各种各样的客户端颁发access token令牌,如服务与服务之间的通讯、网站应用、SPAS和本地应用或者移动应用。
联合网关 支持来自Azure Active Directory, Google, Facebook这些知名应用的身份认证,可以不必关心连接到这些应用的细节就可以保护你的应用
接下来我们用几个例子来快速入门IdentifyServer4 使用客户端授权模式 保护你的api资源 我们先来一个基础的应用场景,保护我们的Api资源
在这个场景中我们定义一个IdentityServer服务,一个API的客户端,一个要访问这个api的客户端。
验证是否成功是从IdentityServer获取一个访问令牌,然后用这个令牌来获得Api的访问权限。
IdentityServer 我们将要保护的资源定义在 Scopes 中,这是我们命名是 api1
1
2
3
4
5
6
public static IEnumerable<ApiResource> GetApiResources (){ return new List<ApiResource> { new ApiResource("api1" , "我的 API" ) }; }
定义能够访问api的客户端。
1
2
3
4
5
6
7
8
9
10
11
12
13
14
15
16
17
18
19
20
21
public static IEnumerable<Client> GetClients (){ return new List<Client> { new Client { ClientId = "client" , AllowedGrantTypes = GrantTypes.ClientCredentials, ClientSecrets = { new Secret("secret" .Sha256()) }, AllowedScopes = { "api1" } } }; }
Startup.cs中配置上IdentityServer
为了让 IdentityServer 使用你的 Scopes 和 客户端 定义,你需要向 ConfigureServices 方法中添加一些代码。你可以使用便捷的扩展方法来实现 —— 它们在幕后会添加相关的存储和数据到 DI 系统中:
1
2
3
4
5
6
7
8
9
10
public void ConfigureServices (IServiceCollection services ){ services.AddControllers(); services.AddIdentityServer().AddDeveloperSigningCredential() .AddInMemoryApiResources(Config.GetApiResources()) .AddInMemoryClients(Config.GetClients()); }
这个时候访问 http://localhost:5000/.well-known/openid-configuration 可以看到 发现文档
API 新建一个站点并添加控制器
1 2 3 4 5 6 7 8 9 10 [Route("identity" ) ] [Authorize() ] public class IdentityController : ControllerBase { [HttpGet() ] public IActionResult Get () { return new JsonResult(from c in User.Claims select new { c.Type, c.Value }); } }
将 IdentityServer4.AccessTokenValidation NuGet 程序包添加到你的 API 项目
然后添加中间件
1
2
3
4
5
6
7
8
9
10
11
12
13
14
15
16
17
18
19
20
public void Configure (IApplicationBuilder app, IWebHostEnvironment env ){ if (env.IsDevelopment()) { app.UseDeveloperExceptionPage(); } app.UseHttpsRedirection(); app.UseRouting(); app.UseAuthentication(); app.UseAuthorization(); app.UseEndpoints(endpoints => { endpoints.MapControllers(); }); }
1
2
3
4
5
6
7
8
9
10
11
12
public void ConfigureServices (IServiceCollection services ){ services.AddControllers(); services.AddAuthentication(IdentityServerAuthenticationDefaults.AuthenticationScheme) .AddIdentityServerAuthentication(IdentityServerAuthenticationDefaults.AuthenticationScheme , jwtOptions => { jwtOptions.RequireHttpsMetadata = false ; jwtOptions.Authority = "http://localhost:5000" ; jwtOptions.ApiName = "api1" ; }); }
将站点启动地址设置为 http://localhost:5001
这个时候,启动访问 http://localhost:5001/identity 可以看到401错误信息,说明访问还没有授权。
创建客户端 我们来编写一个客户端来请求访问令牌,然后使用这个令牌来访问 API。为此你需要为你的解决方案添加一个控制台应用程序。
IdentityServer 上的令牌端点实现了 OAuth 2.0 协议,你应该使用合法的 HTTP 来访问它。然而,我们有一个叫做 IdentityModel 的客户端库,它将协议交互封装到了一个易于使用的 API 里面。
添加 IdentityModel NuGet 程序包到你的客户端项目中。
1
2
3
4
5
6
7
8
9
10
11
12
13
14
15
16
17
18
19
static async System.Threading.Tasks.Task Main (string [] args { var client = new HttpClient(); var tokenClient = new TokenClient(client, new TokenClientOptions { Address = "http://localhost:5000/connect/token" , ClientId = "client" , ClientSecret = "secret" }); var response = await tokenClient.RequestClientCredentialsTokenAsync("api1" ); Console.WriteLine(response.AccessToken); client.SetBearerToken(response.AccessToken); string resStr = await client.GetStringAsync("http://localhost:5001/identity" ); Console.WriteLine(resStr); Console.ReadLine(); }
我们同时启动三个项目,可以看到 http://localhost:5001/identity 返回的结果内容被正常的打印在控制台。
使用密码保护API资源 我们现在使用 客户端发送用户名和密码到令牌服务并获得一个表示该用户的访问令牌 access_token
添加用户 为了方便演示 我们直接使用IdentityServer中的TestUser 类型表示一个测试用户及其身份信息。让我们向配置类(如果你有严格按照顺序进行演练,那么配置类应该在 QuickstartIdentityServer 项目的 Config.cs 文件中)中添加以下代码以创建一对用户
1
2
3
4
5
6
7
8
9
10
11
12
13
14
15
16
17
18
public static List <TestUser > GetUsers (){ return new List<TestUser>() { new TestUser { SubjectId="1" , Username="爱丽丝" , Password="password" }, new TestUser { SubjectId="2" , Username="博德" , Password="password" } }; }
然后将测试用户注册到 IdentityServer
1
2
3
4
5
6
7
8
9
10
11
12
public void ConfigureServices (IServiceCollection services ){ services.AddControllers(); services.AddIdentityServer().AddDeveloperSigningCredential() .AddInMemoryApiResources(Config.GetApiResources()) .AddInMemoryClients(Config.GetClients()) .AddTestUsers(Config.GetUsers()); }
AddTestUsers 扩展方法在背后做了以下几件事:
为资源所有者密码授权添加支持
添加对用户相关服务的支持,这服务通常为登录 UI 所使用(我们将在下一个快速入门中用到登录 UI)
为基于测试用户的身份信息服务添加支持(你将在下一个快速入门中学习更多与之相关的东西)
为资源所有者密码授权添加一个客户端定义 1 2 3 4 5 6 7 8 9 10 11 12 13 14 15 new Client{ ClientId = "ro.client" , AllowedGrantTypes = GrantTypes.ResourceOwnerPassword, ClientSecrets = { new Secret("secret" .Sha256()) }, AllowedScopes = { "api1" } }
使用密码授权请求一个令牌 客户端看起来跟之前 客户端凭证授权 的客户端是相似的。主要差别在于现在的客户端将会以某种方式收集用户密码,然后在令牌请求期间发送到令牌服务。
1 2 3 4 5 6 7 8 9 10 11 12 13 14 15 16 using (var client = new HttpClient()){ var tokenClient = new TokenClient(client, new TokenClientOptions { Address = "http://localhost:5000/connect/token" , ClientId = "ro.client" , ClientSecret = "secret" }); var response = await tokenClient.RequestPasswordTokenAsync("爱丽丝" , "password" , "api1" ); Console.WriteLine(response.AccessToken); client.SetBearerToken(response.AccessToken); string resStr = await client.GetStringAsync("http://localhost:5001/identity" ); Console.WriteLine(resStr); Console.ReadLine(); }
当你发送令牌到身份 API 端点的时候,你会发现与客户端凭证授权
sub 信息的存在(或缺失)使得 API 能够区分代表客户端的调用和代表用户的调用
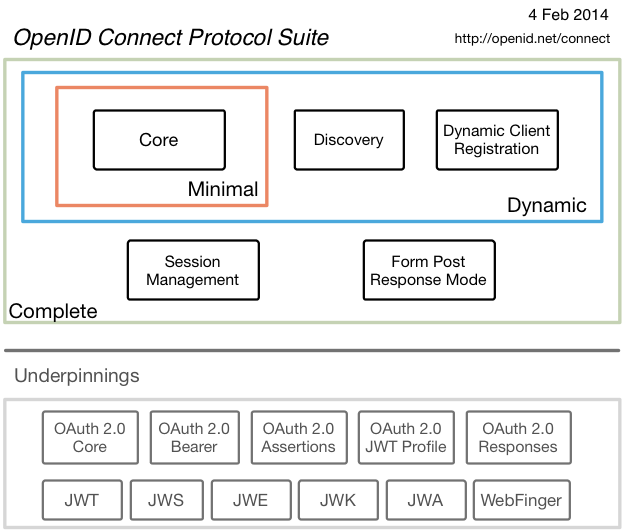
基于 OpenID Connect 的用户认证 OpenID Connect 1.0是OAuth 2.0协议之上的一个简单的身份层。 它允许客户端基于授权服务器执行的身份验证来验证最终用户的身份,以及以可互操作和类似REST的方式获取关于最终用户的基本配置文件信息。 OpenID Connect允许所有类型的客户端(包括基于Web的移动和JavaScript客户端)请求和接收关于认证会话和最终用户的信息。 规范套件是可扩展的,允许参与者使用可选功能,例如身份数据的加密,OpenID提供商的发现和会话管理
OpenID Connect 在OAuth2上构建了一个身份层,是一个基于OAuth2协议的身份认证标准协议。我们都知道OAuth2是一个授权协议,它无法提供完善的身份认证功能,OpenID Connect 使用OAuth2的授权服务器来为第三方客户端提供用户的身份认证,并把对应的身份认证信息传递给客户端,且可以适用于各种类型的客户端(比如服务端应用,移动APP,JS应用,winform应用),且完全兼容OAuth2,也就是说你搭建了一个OpenID Connect 的服务后,也可以当作一个OAuth2的服务来用。
新建一个 MVC的Ids IdentityServer提供了 可以快速创建UI的脚本 https://github.com/IdentityServer/IdentityServer4.Quickstart.UI
然后在start.cs中
1 2 3 4 5 6 7 8 9 10 11 12 13 14 15 16 17 18 19 20 21 22 23 24 25 26 27 28 29 30 31 32 33 34 35 36 37 38 39 40 41 42 43 44 45 46 47 48 49 50 51 52 53 54 55 56 57 58 59 60 61 62 63 64 65 66 67 68 69 70 71 72 73 74 75 76 77 78 79 80 81 82 83 84 85 86 87 88 89 90 91 92 93 using System;using System.Collections.Generic;using System.Linq;using System.Threading.Tasks;using IdentityServer4.Quickstart.UI;using Microsoft.AspNetCore.Builder;using Microsoft.AspNetCore.Hosting;using Microsoft.Extensions.Configuration;using Microsoft.Extensions.DependencyInjection;using Microsoft.Extensions.Hosting;namespace IdentityServer4DotNet.ClientAuth.Ids4s { public class Startup { public Startup (IConfiguration configuration ) { Configuration = configuration; } public IConfiguration Configuration { get ; } public void ConfigureServices (IServiceCollection services ) { services.AddControllersWithViews(); services.Configure<IISOptions>(iis => { iis.AuthenticationDisplayName = "Windows" ; iis.AutomaticAuthentication = false ; }); services.Configure<IISServerOptions>(iis => { iis.AuthenticationDisplayName = "Windows" ; iis.AutomaticAuthentication = false ; }); var builder = services.AddIdentityServer(options => { options.Events.RaiseErrorEvents = true ; options.Events.RaiseInformationEvents = true ; options.Events.RaiseFailureEvents = true ; options.Events.RaiseSuccessEvents = true ; }) .AddTestUsers(TestUsers.Users); builder.AddInMemoryIdentityResources(Config.Ids); builder.AddInMemoryApiResources(Config.Apis); builder.AddInMemoryClients(Config.Clients); builder.AddDeveloperSigningCredential(); } public void Configure (IApplicationBuilder app, IWebHostEnvironment env ) { if (env.IsDevelopment()) { app.UseDeveloperExceptionPage(); } else { app.UseExceptionHandler("/Home/Error" ); } app.UseStaticFiles(); app.UseRouting(); app.UseIdentityServer(); app.UseAuthorization(); app.UseEndpoints(endpoints => { endpoints.MapControllerRoute( name: "default" , pattern: "{controller=Home}/{action=Index}/{id?}" ); }); } } }
注意现在的中的Clients添加一个client
1 2 3 4 5 6 7 8 9 10 11 12 13 14 15 16 17 18 19 20 21 22 23 24 25 26 27 28 29 new Client{ ClientId = "mvc client" , ClientName = "ASP.NET Core MVC Client" , AllowedGrantTypes = GrantTypes.CodeAndClientCredentials, ClientSecrets = { new Secret("mvc secret" .Sha256()) }, RedirectUris = { "http://localhost:5002/signin-oidc" }, FrontChannelLogoutUri = "http://localhost:5002/signout-oidc" , PostLogoutRedirectUris = { "http://localhost:5002/signout-callback-oidc" }, AlwaysIncludeUserClaimsInIdToken = true , AllowOfflineAccess = true , AccessTokenLifetime = 60 , AllowedScopes = { "api1" , IdentityServerConstants.StandardScopes.OpenId, IdentityServerConstants.StandardScopes.Email, IdentityServerConstants.StandardScopes.Address, IdentityServerConstants.StandardScopes.Phone, IdentityServerConstants.StandardScopes.Profile } },
新建一个 MVC 客户端 接下来你将向解决方案添加一个 MVC 应用程序,可以使用 ASP.NET Core “Web 应用程序” 模板来实现。 将应用程序配置为使用 5002 端口(可以查看概览部分以了解如何配置)。
为了能向 MVC 应用程序添加 OpenID Connect 认证支持,请添加如下 NuGet 程序包:
Microsoft.AspNetCore.Authentication.Cookies
Microsoft.AspNetCore.Authentication.OpenIdConnect
mvc的client的start.cs如下
1 2 3 4 5 6 7 8 9 10 11 12 13 14 15 16 17 18 19 20 21 22 23 24 25 26 27 28 29 30 31 32 33 34 35 36 37 38 39 40 41 42 43 44 45 46 47 48 49 50 51 52 53 54 55 56 57 58 59 60 61 62 63 64 65 66 67 68 69 70 71 72 73 74 75 76 77 78 79 80 81 82 83 84 85 86 87 88 89 90 91 92 93 94 using System;using System.Collections.Generic;using System.IdentityModel.Tokens.Jwt;using System.Linq;using System.Threading.Tasks;using IdentityModel;using Microsoft.AspNetCore.Authentication.Cookies;using Microsoft.AspNetCore.Authentication.OpenIdConnect;using Microsoft.AspNetCore.Builder;using Microsoft.AspNetCore.Hosting;using Microsoft.AspNetCore.Http;using Microsoft.Extensions.Configuration;using Microsoft.Extensions.DependencyInjection;using Microsoft.Extensions.Hosting;namespace IdentityServer4DotNet.ClientAuth.MVCClient { public class Startup { public Startup (IConfiguration configuration ) { Configuration = configuration; } public IConfiguration Configuration { get ; } public void ConfigureServices (IServiceCollection services ) { services.Configure<CookiePolicyOptions>(options => { options.CheckConsentNeeded = context => true ; options.MinimumSameSitePolicy = SameSiteMode.None; }); services.AddControllersWithViews(); JwtSecurityTokenHandler.DefaultInboundClaimTypeMap.Clear(); services.AddAuthentication(options => { options.DefaultScheme = CookieAuthenticationDefaults.AuthenticationScheme; options.DefaultChallengeScheme = OpenIdConnectDefaults.AuthenticationScheme; }) .AddCookie(CookieAuthenticationDefaults.AuthenticationScheme) .AddOpenIdConnect(OpenIdConnectDefaults.AuthenticationScheme, options => { options.SignInScheme = CookieAuthenticationDefaults.AuthenticationScheme; options.Authority = "http://localhost:5000" ; options.RequireHttpsMetadata = false ; options.ClientId = "mvc client" ; options.ClientSecret = "mvc secret" ; options.SaveTokens = true ; options.ResponseType = "code" ; options.Scope.Clear(); options.Scope.Add("api1" ); options.Scope.Add(OidcConstants.StandardScopes.OpenId); options.Scope.Add(OidcConstants.StandardScopes.Profile); options.Scope.Add(OidcConstants.StandardScopes.Email); options.Scope.Add(OidcConstants.StandardScopes.Phone); options.Scope.Add(OidcConstants.StandardScopes.Address); options.Scope.Add(OidcConstants.StandardScopes.OfflineAccess); }); } public void Configure (IApplicationBuilder app, IWebHostEnvironment env ) { if (env.IsDevelopment()) { app.UseDeveloperExceptionPage(); } else { app.UseExceptionHandler("/Home/Error" ); } app.UseStaticFiles(); app.UseRouting(); app.UseAuthentication(); app.UseAuthorization(); app.UseCookiePolicy(); app.UseEndpoints(endpoints => { endpoints.MapControllerRoute( name: "default" , pattern: "{controller=Home}/{action=Index}/{id?}" ); }); } } }
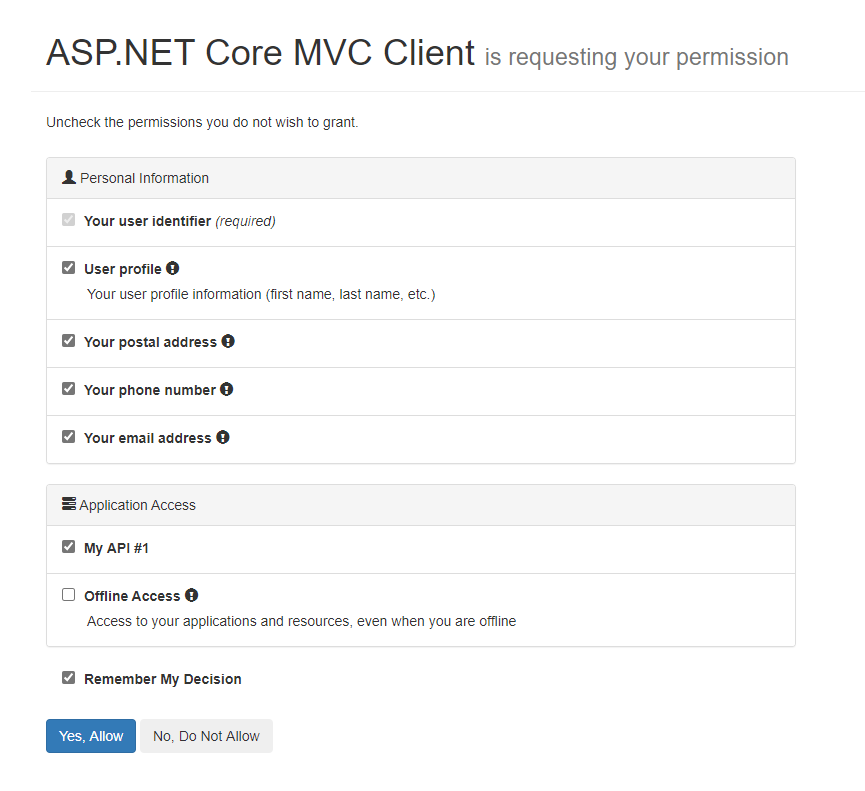
现在我们多启动项目,看到mvcclient自动跳转到 ids网站,输入testuser的账号密码之后看到如下界面
Yes,Allow
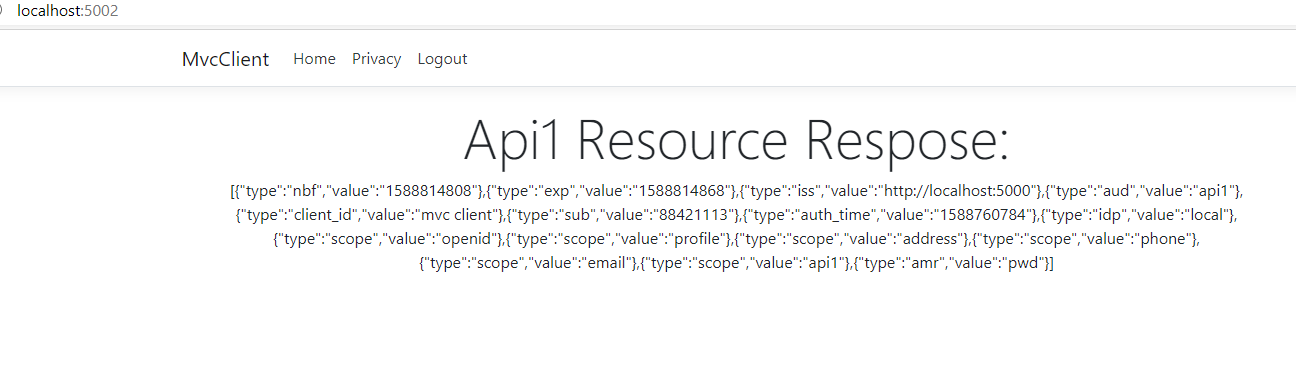
然后我们看到看到跳转到了
到此我们的 基本 OpenID Connect 的用户认证完成
尝试一个外部认证 接下来我们以Google身份认证为例,添加对Google的支持
首先我们需要在Google的开发人员控制台 申请 OAuth 2.0 客户端 IDhttp://localhost:5000/signin-google
然后在ids中添加nuget引用 Microsoft.AspNetCore.Authentcation.Google 到项目中
1
2
3
4
5
6
7
8
9
10
11
services.AddAuthentication() .AddGoogle(options => { options.SignInScheme = IdentityServerConstants.ExternalCookieAuthenticationScheme; options.ClientId = "629456249245-4vf1gvlltllq592coo46hrc8ofqa8cg6.apps.googleusercontent.com" ; options.ClientSecret = "XhUa6NODSIGOtSPBuGrTeeeW" ; });
注意:在 ASP.NET Core Identity 中使用外部认证的时候,SignInScheme 必须设置为 Identity.External,而不是 IdentityServerConstants.ExternalCookieAuthenticationScheme。
再次运行项目可以看到登录页面是多了个Google按钮。
通过认证后,你可以看到现在的身份信息是由 Google 数据提供的了。
更多实验 你可以使用 QQ认证,微信认证等来实验 IdentityServer4的神奇之处。
当然 你也可以在 https://github.com/IdentityServer/IdentityServer4/tree/master/samples 中看到更多开源的例子。