继react-native-redux入门 & 使用Visual Studio Code和typescript 开发调试React Native项目 之后,这次我们继续 React Native Typescript 系列
项目初始化的细节就不一一叙述的,感兴趣的同学可以看下上面两篇博客,我把最终代码放到了 我的github仓库上 ,里面有每个步骤的修改的代码记录。
原来的样子 首先我们修改我们的src/index.tsx 实现一个简单的计数器 代码如下
1
2
3
4
5
6
7
8
9
10
11
12
13
14
15
16
17
18
19
20
21
22
23
24
25
26
27
28
29
30
31
32
33
34
35
36
37
38
39
40
41
42
43
44
45
46
47
48
49
50
51
52
53
54
55
56
57
58
59
60
import React , { Component } from "react" ;import { StyleSheet , Text , View , Button , Platform } from "react-native" ; interface Props {} interface State { count :number ; } const instructions = Platform .select ({ ios : 'Press Cmd+R to reload,\n' + 'Cmd+D or shake for dev menu' , android : 'Double tap R on your keyboard to reload,\n' + 'Shake or press menu button for dev menu' , }); export default class App extends Component <Props , State > { constructor (props:Props ) { super (props); this .state ={count :0 }; } add = ()=> { this .setState ({count :this .state .count +1 }) }; render ( return ( <View style ={styles.container} > <Text style ={styles.welcome} > Welcome to React Native&typescript!</Text > <Text style ={styles.instructions} > To get started, edit src/App.js</Text > <Text style ={styles.instructions} > {instructions}</Text > <Text style ={styles.instructions} > {this.state.count}</Text > <Button onPress ={this.add} title ="add" > </Button > </View > ); } } const styles = StyleSheet .create ({ container : { flex : 1 , justifyContent : 'center' , alignItems : 'center' , backgroundColor : '#F5FCFF' , }, welcome : { fontSize : 20 , textAlign : 'center' , margin : 10 , }, instructions : { textAlign : 'center' , color : '#333333' , marginBottom : 5 , }, });
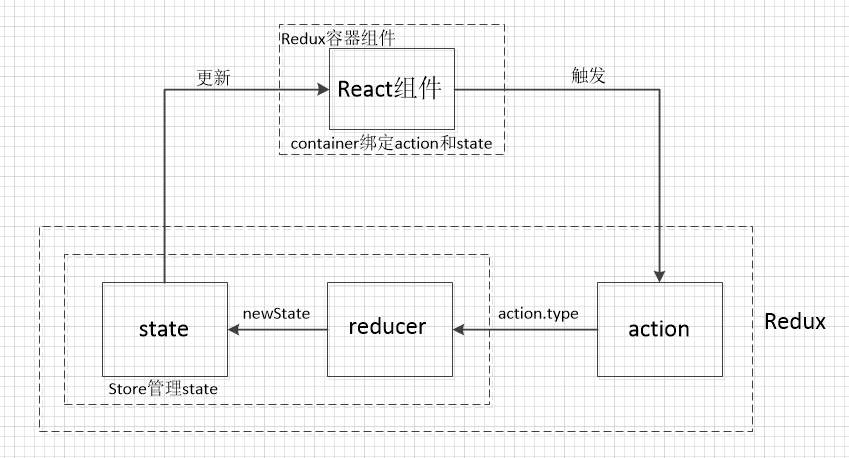
开始redux化 接下来我们按照Redux管理React数据流实现代码
<Provider store={store}>
    //项目代码
</Provider>
actions 指全局发布的动作指令,主要就是定义所有事件行为的
首先声明定义 actionsTypesactionsTypes.ts
1 export const ADD ="ADD" ;
新建actions.ts
1
2
3
4
5
6
import {ADD } from './actionsTypes' ;const add =(type :ADD })export { add }
reducers Store是如何具体管理State呢?实际上是通过Reducers根据不同的Action.type来更新不同的state,即(previousState,action) => newState。最后利用Redux提供的函数combineReducers将所有的Reducer进行合并,更新整个State树
会用到的state类型statesTypes.ts
1
2
3
export class CounterState { count :number }
新建reducers.ts
1
2
3
4
5
6
7
8
9
10
11
12
13
14
15
16
17
18
import { combineReducers } from 'redux' ;import {ADD } from './actionsTypes' ;import {CounterState } from './statesTypes' ;const defaultState={ count :0 } as CounterState ; function counter (state=defaultState,action:any ){switch (action.type ) { case ADD : return {...state,count :state.count +1 }; default : return state; } } export default combineReducers ({ counter :counter });
store 在 Redux 应用中,只允许有一个 store 对象,管理应用的 state.可以理解为一个存放APP内所有组件的state的仓库.
新建store.ts
1
2
3
4
5
import { createStore, applyMiddleware, compose } from 'redux' ;import rootReducer from './reducers' ;const store=createStore (rootReducer);export default store;
Provider Provider 本身并没有做很多事情,只是把 store放在 context 里罢了,本质上 Provider 就是给 connect 提供 store 用的。
新建index.tsx
1
2
3
4
5
6
7
8
9
10
11
12
13
14
import React , { Component } from 'react' ;import { Provider } from 'react-redux' ;import Home from './home' ;import store from './store' ;export default class App extends Component { render ( return ( <Provider store ={store} > <Home /> </Provider > ); } }
Container 利用Container容器组件作为桥梁,将React组件和Redux管理的数据流联系起来。Container通过connect函数将Redux的state和action转化成展示组件即React组件所需的Props。
新建home.tsx
1
2
3
4
5
6
7
8
9
10
11
12
13
14
15
16
17
18
19
20
21
22
23
24
25
26
27
28
29
30
31
32
33
34
35
36
37
38
39
40
41
42
43
44
45
46
47
48
49
50
51
52
53
54
55
56
57
58
59
60
61
62
63
64
65
66
import React , { Component } from 'react' ;import { StyleSheet , Text , View , Button , Platform } from 'react-native' ; import { connect, DispatchProp } from 'react-redux' ;import { add } from './actions' ;import {CounterState } from './statesTypes' ;interface State {} type Props =CounterState &DispatchProp const instructions = Platform .select ({ ios : 'Press Cmd+R to reload,\n' + 'Cmd+D or shake for dev menu' , android : 'Double tap R on your keyboard to reload,\n' + 'Shake or press menu button for dev menu' , }); class Home extends Component <Props , State > { constructor (props:Props ) { super (props); } _add = ()=> { this .props .dispatch (add ()) }; render ( return ( <View style ={styles.container} > <Text style ={styles.welcome} > Welcome to React Native&typescript!</Text > <Text style ={styles.instructions} > To get started, edit src/App.js</Text > <Text style ={styles.instructions} > {instructions}</Text > <Text style ={styles.instructions} > {this.props.count}</Text > <Button onPress ={this._add} title ="add" > </Button > </View > ); } } const styles = StyleSheet .create ({ container : { flex : 1 , justifyContent : 'center' , alignItems : 'center' , backgroundColor : '#F5FCFF' , }, welcome : { fontSize : 20 , textAlign : 'center' , margin : 10 , }, instructions : { textAlign : 'center' , color : '#333333' , marginBottom : 5 , }, }); const mapStateToProps = (state:any ) => ( state.counter ) export default connect (mapStateToProps)(Home );
最终代码在 https://github.com/YahuiWong/react-native-typescript/tree/114aefbd3fbb96f9c67db068b340b908ed54276d
